How to Conduct a Live Webcast in VIDIZMO
VIDIZMO enables you to schedule, broadcast, and manage live webcasts. You can stream to unlimited public or private audiences, enable real-time viewer interaction, and record sessions for on-demand playback.
Prerequisites
- Configure an ECDN Node with your Streaming Server Provider. For more information, see:
- Create a Publishing Point for the configured ECDN Node. For more information, see:
- You must belong to a group with Live Streaming and Live Control Room features enabled, or have a CAL that grants these permissions.
Schedule a Live Webcast
- In the left navigation panel, select Add Media.
- On the Add Media page, select the Setup Live card.
- Configure the live session using the following tabs.
Basic Settings Tab
The Basic Settings tab contains metadata fields for your live session:
- Title: Enter a descriptive title for the live webcast (required).
- Category: Select a category to organize the webcast.
- Tags: Add keywords for searchability.
- Description: Add details about the session content.
- Author Name: Enter the author's name (required).
For more information about these fields, see Understanding Media Settings.
Publish Tab
The Publish tab controls playback and sharing options:
- Player Template: Select a player template for the webcast.
- Completion Criteria: Define when the content is considered complete.
- Sharing and Download: Configure the following options:
- Allow Social Sharing: Enable sharing to social media platforms.
- Allow Embedding: Enable embedding on external websites.
- Allow Downloading: Enable file downloads.
- Allow Comments: Enable viewer comments.
- Comments will be Moderated: Require approval for comments before display.
- Allow Anonymous Comments: Enable comments from anonymous users.
Access and Sharing Tab
The Access and Sharing tab controls who can view the live webcast:
- Inherit Parent Access Rights: Toggle to inherit access settings from the parent folder.
- Who Can Access It: Select one of the following options:
- All Account and Channel Viewers: All users with portal access.
- All Channel Viewers: Users with channel access.
- Anonymous Viewers: Public access without authentication.
- Only Me: Restrict to only your account.
- Specific Viewers: Specify users or groups who can view.
- Player Password: Set a password for viewer access.
- When Will It Be Available:
- Available From: Set the start date for availability.
- Expires After: Set the expiration date.
Interactivity Tab
The Interactivity tab enables real-time viewer engagement options:
- Enable Live Chat Among Viewers: Allows registered users to exchange messages during the session. Anonymous users can specify a display name. Participants can respond to specific messages for threaded conversations.
- Archive Chat Messages: Preserves live chat as comments on the playback page after the session ends (visible when chat is enabled).
- Show Yammer Feed: Displays a Yammer feed during the session. Configure the Yammer Feed Type (My Feed, Group, User, or Topic) and enter the corresponding Yammer Feed ID. See How do I find a Yammer group's feedID?
- Show Twitter Feed: Displays a Twitter timeline during the session. Enter the Twitter Widget Code. See How to embed a timeline
- Enable Q&A: Provides a Q&A section where participants can submit questions. Only users with Moderator or higher roles can respond, but all questions and responses are visible to all viewers.
For more information, see How to Enable and View Interactivity Options in a Live Session.
Live Source Tab
The Live Source tab configures the stream source (required):
- Select the Publishing Point for your live stream from the dropdown.
- For Wowza Cloud or Wowza On-premise Publishing Points, use the Start and Stop buttons to control the Publishing Point.
- Note the Ingest URL and Stream Name displayed in the Setup Encoder section.
- Configure your live encoder to push the stream to the Ingest URL. See Set Up Wirecast Encoder for an example configuration.
- Select Publishing Point Settings to view or modify the Publishing Point configuration.
Schedule Tab
The Schedule tab defines when the live webcast occurs (required):
- Start Date: Select the date for the session (required).
- Start Time: Select the time for the session to begin.
- Session Length: Specify the session duration in hours and minutes.
- Select Timezone: Select the timezone for the webcast (required).
- Show Event Agenda: Enable to display an agenda to viewers. Enter the agenda content in the editor.
- Select Save or Save and Close.
A notification confirms the media has been published successfully.
Set Up Wirecast Encoder
To stream a live webcast, configure your encoder to push the stream to the Publishing Point's ingest URL. This example uses Telestream Wirecast, but VIDIZMO supports any RTMP-compatible encoder.
Get Publishing Point Parameters
- Navigate to Control Panel > Live Streaming > Publishing Point.
- Select the Publishing Point you want to use.
- From the editing screen, copy the following parameters:
- Ingest Point: The RTMP URL for receiving the stream.
- Stream Name: The unique identifier for the stream.
- Username: The authentication username (if enabled).
- Password: The authentication password (if enabled).
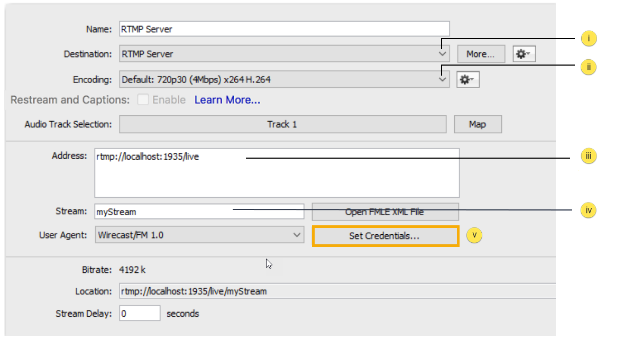
Configure Wirecast
- Launch Wirecast and configure the Output Settings:
- Destination: Select RTMP Server.
- Encoding: Select a rendition allowed in your Streaming Provider configuration.
- Address: Paste the Ingest Point URL from VIDIZMO.
- Stream: Enter the Stream Name from VIDIZMO.
- Credentials: If authentication is enabled, select Set Credentials and enter the Username and Password from VIDIZMO.
-
Configure your input stream (shots) in Wirecast. See the Wirecast Shot Editor documentation for details.
-
Start broadcasting to the configured destination. See the Wirecast Broadcasting documentation for details.
Manage a Live Session
After scheduling and configuring your encoder, navigate to the live playback page to manage the session.
Start or Preview Session
The player displays the following options before the session begins:
- Countdown Timer: Shows the time remaining until the scheduled start.
- Start Session: Begins the live broadcast for all viewers.
- Preview Session: Allows you to verify the stream before going live.
Session Controls
During the session, the following controls are available:
- Pause/Resume: Pauses the live feed for all viewers, displaying a "Session is currently paused" message. Live chat and Q&A are also paused. Select Resume to continue the broadcast.
- Stop: Ends the session permanently. A "Session has ended" message displays to all viewers. Live chat and Q&A are archived if archiving was enabled.
NOTE: Pausing, resuming, or stopping the session from the playback screen does not affect the configured Publishing Point. The encoder continues streaming until manually stopped.
Viewer Engagement
The playback page provides options for viewers:
- Like/Unlike: Rate the session.
- Share: Share with specific users, groups, or via email. See How to Refer Media to Viewers and Limited Sharing with Viewing & Editing Rights.
- Favorite: Add to your favorites.
- Add to Calendar: Add the session to your calendar application.
- Embed: Get embed code for external websites.
Interactivity Pane
The right pane displays the interactivity options enabled during scheduling (Live Chat, Q&A, Yammer Feed, Twitter Feed). See How to Enable and View Interactivity Options in a Live Session.
Live Analytics
Real-time analytics display during the session:
- Total Unique Users: Number of distinct users who joined the session.
- Total Connected Users: Number of users currently watching.
- Total Views: Total page visits (one user visiting three times counts as one unique user but three total views).
Recording Options
VIDIZMO supports multiple recording methods depending on your streaming server provider:
Wowza Streaming Engine and Wowza Streaming Cloud
Record your live broadcast and automatically save it as an on-demand video in your portal. The recording is published and accessible directly from your library.
General Streaming Servers
Configure server-side recording through your streaming provider. After recording, manually upload the file to VIDIZMO.
Client-Side Recording
Enable your encoder to record locally. In Wirecast, see Record to Disk. Ensure sufficient disk space and RAM for local recording.
NOTE: Server-side recording is recommended when available. Use client-side recording only if your streaming provider does not support server-side recording.
For more information about recording options, see Understanding Live Streaming in VIDIZMO.
Related Articles
- How to Enable and View Interactivity Options in a Live Session
- Understanding Live Streaming in VIDIZMO
- Upload Your First Media in VIDIZMO